

How To Repair Readout Crystal On Kitchen Timer
Arduino Kitchen Timer
An Arduino UNO-based classic kitchen timer with LCD display and buzzer
Intermediate Full instructions provided 105,294
Things used in this projection
Story
In the offset God created the heaven and the earth. And homo beings. And man beings created digital kitchen timers, like this ane.
And human beings said, Absurd just a niggling dismal. Allow'south make a better 1!
And God said, I heard your phone call, let there be Arduinos: and at that place was Arduinos all over the earth, and that was proficient.
And man beings took an Arduino and created a meliorate kitchen timer, like this i.
And God saw the new kitchen timer and said: I saw your new kitchen timer and it looks awful , but information technology seems too much fun ! And that is good . :-)
What you need to have
Now that you know where all this came from, let'southward go deep into it.
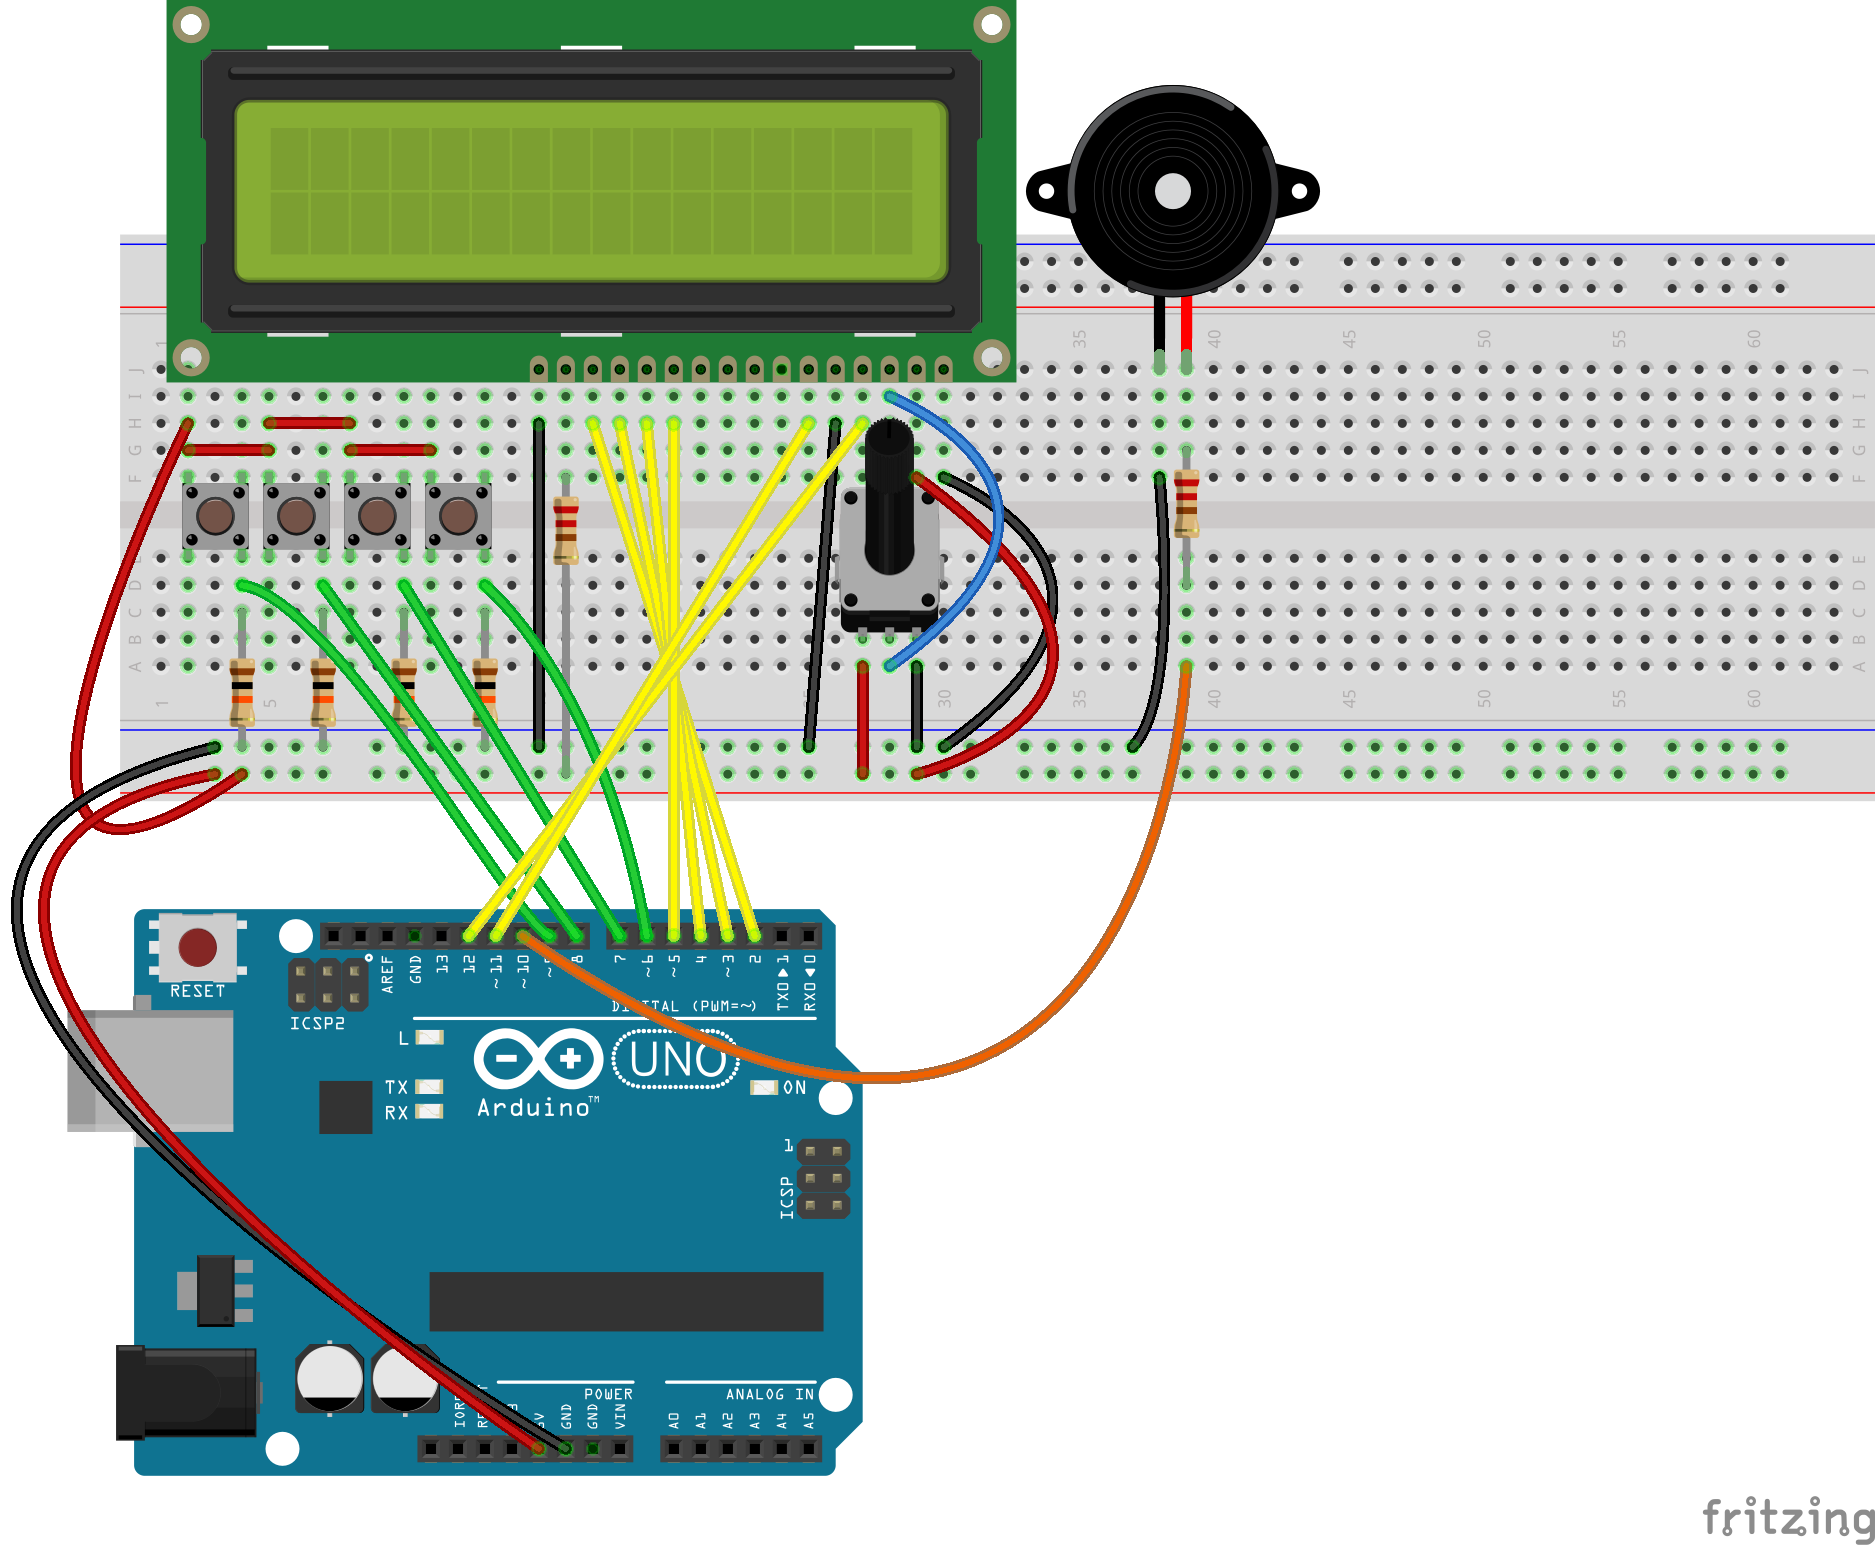
All components I used came from the Arduino Starter Kit , including the small breadboard you see in the pics and in the video. Feel costless to accomodate the projection into a larger one , if you wish.
Y'all'll demand a power source too: while playing around, the PC' USB port and cable will exist plenty.
What you need to do
First: please gather all needed components from the Starter Kit or your preferred component bin; if you don't take one, don't panic. There's enough of on the Internet. You can detect the component list below.
And, well, you'll need the code too. It's in its box, below again.
How it works
Basically, like any other like device you can buy for a buck at any store most you. Just this is yours . And this volition show y'all how those fiddling gadgets actually piece of work.
The keyword here is: current mode . The timer itself tin run in only i out of four modes at a time:
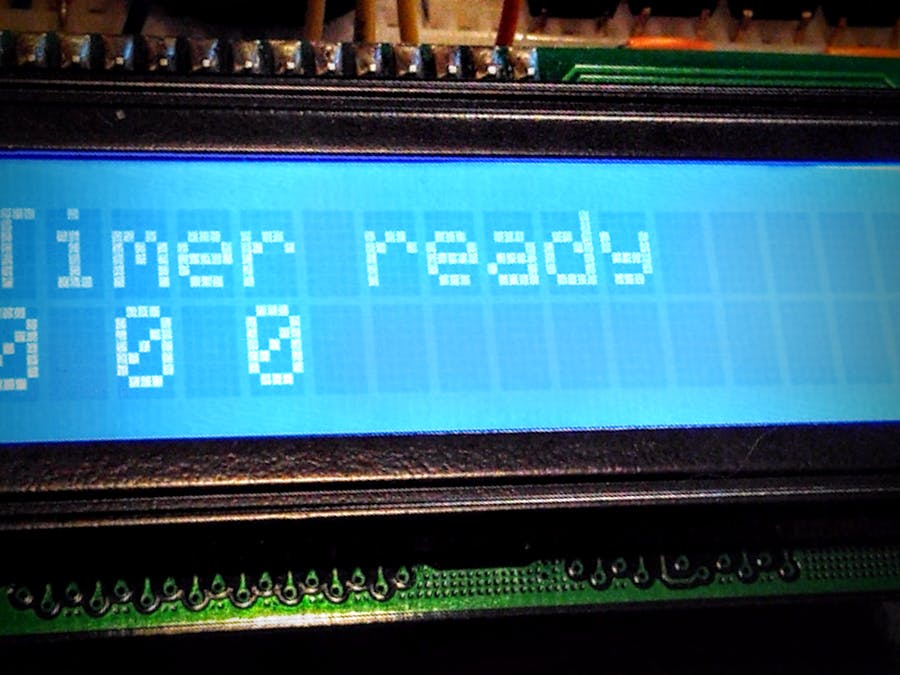
- IDLE - the timer is awaiting for your input, showing the currently fix time amount; this is as well the initial fashion after power upwardly or reset.
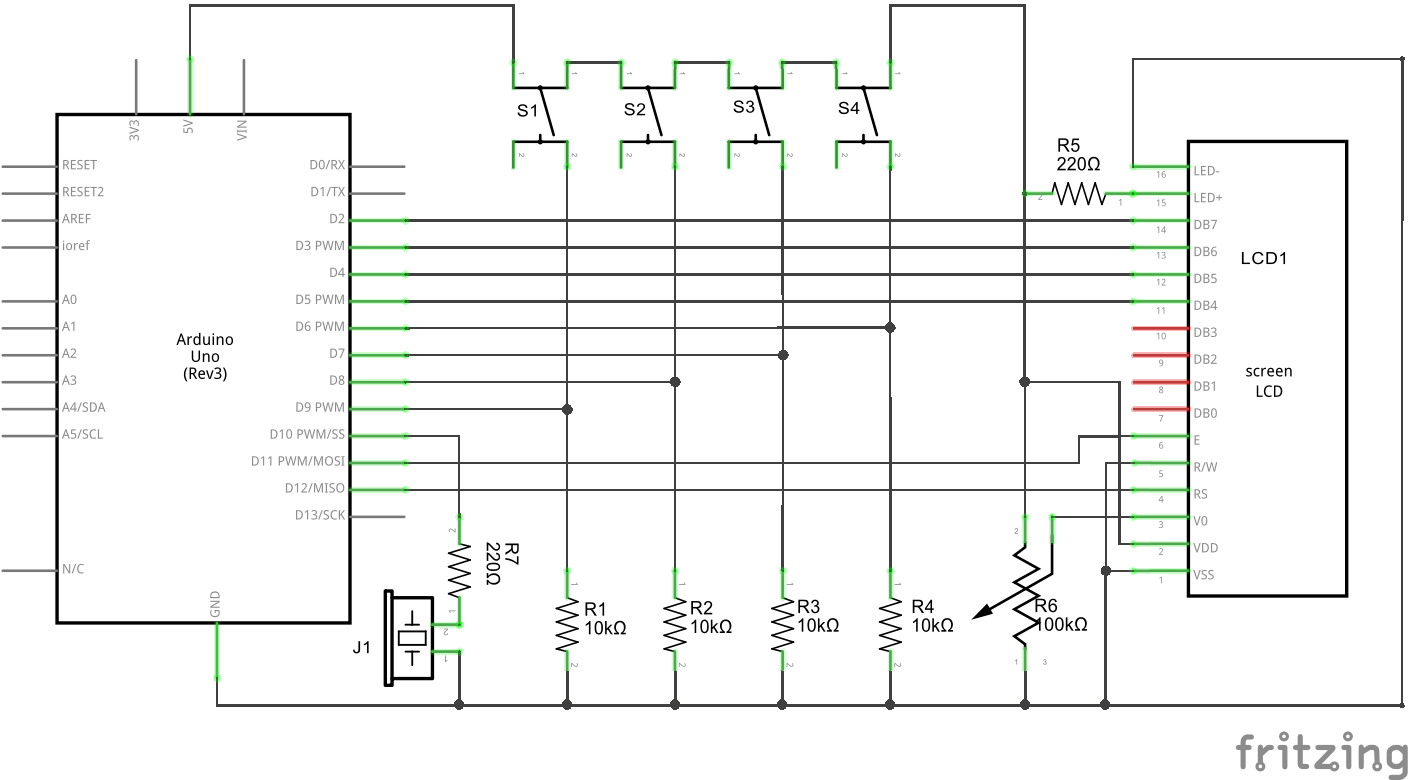
- SETUP - y'all can enter this style by long-pressing S4 (in the lawmaking this is chosen also "reset button"); here, past using S3 ("start stop button"), you tin can choose which value to change in order to set the elapsed time to be counted downwards afterwards; finally, using S2 ("down button") and S1 ("upward push") respectively, you can subtract or increase the choosen value (hours, minutes or seconds).
- RUNNING - You tin enter this manner by pressing S3, while leaving information technology will require both S3 or S4 (which will lead you to IDLE way).
- RINGING - When the desider corporeality of fourth dimension is elapsed, this mode is automatically activated; y'all can leave it (i.eastward., make the little male child stop ringing) past pressing any switch.
The code
First, we need to include the proper libraries:
                              #include <LiquidCrystal.h>
                #include <TimeLib.h>
If y'all don't have them already, you'll need to download and install them:
- Paul Stoffregen's Fourth dimension Library (delight download the ZIP from the green "Clone or download" button)
- Arduino LiquidCrystal Library
Next, let's initialize that squeamish LCD module:
LiquidCrystal lcd(12, 11, v, iv, 3, ii); Please experience free to scramble the pins at your will in club to obtain a dainty wiring layout: don't follow me in this, as I did a terrible wiring plan! :D For instance, you tin opposite the latter four pins in the to a higher place statement in order to avoid the xanthous wires crossing you can see in the schematic beneath (obviously, you'll accept to adapt the push button pin constants appropriately, see below). Play, have fun! The life with Arduinos starts right after that copy/paste!
The next 51 code lines contain the static variables annunciation and initialization. Please feel free to scan them, their crystal-articulate names and some scattered comments will guide you understanding the whole thing.
The setup() function carries out the usual preliminary steps you've seen gazillions of times in any Arduino sketch out at that place and so far. The only notable statement is the first, which will set the initial LCD display cursor's position. Because, yes: this module requires y'all to setup a position along its rows and cols so to "print" something, which will announced starting from that position.
Now allow's move to the loop() function.
Showtime of all, let's discover the switch statuses. In guild to achieve this, the following code block is used for nearly each of them:
                              /*
                                  * Start/Stop button management
                                  */
                                  startStopButtonPressed = false;
                                  startStopButtonState = digitalRead(startStopButtonPin);
                                  if(startStopButtonState != startStopButtonPrevState)
                                  {
                                  startStopButtonPressed = startStopButtonState == Loftier;
                                  startStopButtonPrevState = startStopButtonState;
                                  }
A digitalRead is issued against the related pin and the result is compared to a previously readed value: if something has changed, the new value is stored for future reference and the bool "xxxButtonPressed" static variable is gear up to true if the push button is pressed.
Looking at the circuit diagram beneath, you'll notice that each input pin is forced to Depression by a 10k resistor unless the corresponding switch is pressed and the pin itself is directly connected to +5V. A fairly classic scenario, uh?
Previously, I said " nearly each of them" because in that location'southward ane button that acts in a different way than the others: S4. Its code block is capable of detecting the aforementioned long press in club to enter SETUP mode.
Side by side comes the manner management block switch: each example looks at the button state triggers ("xxxButtonPressed") and redirects the menses toward the proper new country, or performs the proper action.
                              instance MODE_IDLE:
                                  if(resetButtonPressed)
                                  {
                                  Reset();
                                  }
                                  if(resetButtonLongPressed)
                                  {
                                  currentMode = MODE_SETUP;
                                  }
                                  if(startStopButtonPressed)
                                  {
                                  currentMode = currentMode == MODE_IDLE ? MODE_RUNNING : MODE_IDLE;
                                  if(currentMode == MODE_RUNNING)
                                  {
                                  // STARTING TIMER!
                                  startTime = at present();
                                  }
                                  }
                                  break;
The previous code snippet shows how the IDLE mode is managed, and it'south pretty self-explanatory. Another case shows how any button press while ringing will cease it:
                              case MODE_RINGING:
                                  if(resetButtonPressed || startStopButtonPressed || downButtonPressed || upButtonPressed)
                                  {
                                  currentMode = MODE_IDLE;
                                  }
                                  break;
Looks like shooting fish in a barrel, isn't it? :-) It is.
The next block - "Time management" - performs the actual time divergence calculation, triggers the RINGING mode and actually rings the buzz when information technology's fourth dimension to do so.
The concluding block - "LCD management" - manages the LCD display for each mode by printing the proper strings at their proper locations.
That's information technology.
Wrap upward and action!
Now that this little puppy has no more than secrets to you, let's meet it in activity. Thanks for watching, and accept fun!
Schematics
Code
Credits

How To Repair Readout Crystal On Kitchen Timer,
Source: https://www.hackster.io/i-and-myself/arduino-kitchen-timer-db8ba6
Posted by: porcheprown1962.blogspot.com
0 Response to "How To Repair Readout Crystal On Kitchen Timer"
Post a Comment